Node-Koa-Templates
开源Node-Koa后端服务框架模板 参考:
- 【东方骏:】Koa2 + Ts 项目结构搭建 保姆级教程。
- 【写代码的Mokel】nodejsts项目的基础工程化配置.
- 【前端小付】fluxy-admin后台管理系统开发记录
- 【小满zs】项目架构MVC,IoC,DI
Node-Koa-Templates使用MVC架构
MVC(Model-View-Controller)是一种常用的软件架构模式,用于设计和组织应用程序的代码。它将应用程序分为三个主要组件:模型(Model)、视图(View)和控制器(Controller),各自负责不同的职责。
- 模型(Model):模型表示应用程序的数据和业务逻辑。它负责处理数据的存储、检索、验证和更新等操作。模型通常包含与数据库、文件系统或外部服务进行交互的代码。
- 视图(View):视图负责将模型的数据以可视化的形式呈现给用户。它负责用户界面的展示,包括各种图形元素、页面布局和用户交互组件等。视图通常是根据模型的状态来动态生成和更新的。
- 控制器(Controller):控制器充当模型和视图之间的中间人,负责协调两者之间的交互。它接收用户输入(例如按钮点击、表单提交等),并根据输入更新模型的状态或调用相应的模型方法。控制器还可以根据模型的变化来更新视图的显示。
由于是前后端分离,所以
依赖
web框架: koa + ts
热更新:ts-node-dev + ts-node
代码格式检查:eslint
代码格式化:prettier + onchange
orm:prisma
日志:log4js
token生成:jsonwebtoken
进程守护:pm2目录结构
.
├── docs             // 文档目录
├── logs             // 日志文件夹
├── public           // 资源文件夹
├── script           // 工具脚本
├── src              // 放代码
│   ├── config       // 配置文件夹
│   │   │── assets   // 存放证书文件
│   │   │── code     // 存放http返回状态
│   │   │── casbin.model.conf   // casbin权限模型配置
│   │   │── constant.ts         // 服务程序全局配置文件
│   │   │── pm2.config.ts       // pm2部署配置
│   ├── controllers   // 控制器,处理路由逻辑
│   ├── middlewares   // 中间件,请求预处理逻辑,例如权限验证
│   ├── prisma        // 数据库访问ORM层
│   ├── routers       // 路由定义
│   ├── services      // 数据服务层,处理数据库业务
│   ├── tests         // 测试文件夹
│   ├── utils         // 工具函数或类
├── .env              // 环境变量文件参考
├── .gitignore        // git忽略文件
├── README.md // 项目描述文件搭建过程
1、初始化工程
npm init -y2、安装依赖
安装生产环境依赖:
npm i koa koa-body koa-router log4js pm2 axios jsonwebtoken安装生产环境依赖:
npm i @types/koa @types/koa-router @types/log4js @types/jsonwebtoken prettier eslint nodemon typescript ts-node @types/node -D3、创建ts管理文件:tsconfig.json
{
  "compilerOptions": {
    // 目标语言版本
    "target": "esnext",
    // 指定生成代码的模板标准
    "module": "commonjs",
    // 指定编译目录(要编译哪个目录)
    "rootDir": "./src",
    // 严格模式
    "strict": true,
    //  tsc编译后存放目录
    "outDir": "./build",
    // 没有默认导出时, 编译器会创建一个默认导出
    "allowSyntheticDefaultImports": true,
    // 允许export= 导出, 由import from导入
    "esModuleInterop": true,
    // 禁止对同一个文件的不一致的引用
    "forceConsistentCasingInFileNames": true
  },
  "ts-node": {
    "compilerOptions": {
      "module": "CommonJS"
    }
  }
}4、配置ESLINT代码检测
ESLint 是一个用于识别和报告在 ECMAScript/JavaScript 代码中发现的模式的工具,其目标是使代码更加一致并避免错误。
补充安装开发依赖:
npm i eslint @typescript-eslint/parser @typescript-eslint/eslint-plugin -D安装完成后在根目录下分别创建 .eslintrc 和 .eslintignore 文件,在 .eslintrc文件中填充一些配置项:
{
  //该配置项主要用于指示此.eslintrc文件是Eslint在项目内使用的根级别文件
  "root": true,
  //默认情况下,Eslint使用其内置的 Espree 解析器,该解析器与标准 JavaScript 运行时和版本兼容.而我们需要将ts代码解析为eslint兼容的AST,所以此处我们使用 @typescript-eslint/parser
  "parser": "@typescript-eslint/parser",
  //该配置项告诉eslint我们拓展了哪些指定的配置集
  "extends": [
    //该配置集是 ESLint 内置的“推荐”,它打开一组小的、合理的规则,用于检查众所周知的最佳实践
    "eslint:recommended",
    //该配置集是typescript-eslint的推荐,它与eslint:recommended相似,但它启用了特定于ts的规则
    "plugin:@typescript-eslint/recommended",
    //该配置集禁用 eslint:recommended 配置集中已经由 typeScript 处理的规则,防止eslint和typescript之间的冲突。
    "plugin:@typescript-eslint/eslint-recommended"
  ],
  //该配置项指示要加载的插件
  // @typescript-eslint 插件使得我们能够在我们的存储库中使用typescript-eslint包定义的规则集
  "plugins": ["@typescript-eslint"]
}在.eslintignore中填入当前需要忽略的文件,包括编译输出目录build, 所有node_modules文件夹 和package-lock.json文件
build / node_modules / package - lock.json在package.json中新增执行eslint工具的脚本,关于所使用的eslint命令行工具的可用options,可以在eslint的官方文档中获取详细信息。
 "scripts": {
      "lint": "eslint . --ext .js,.ts"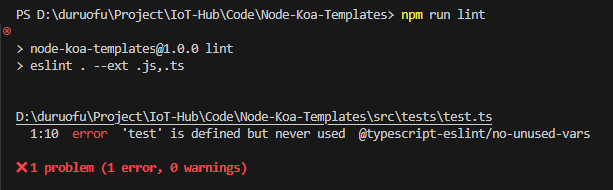
}测速:
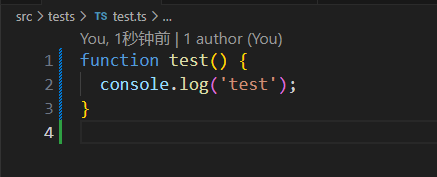
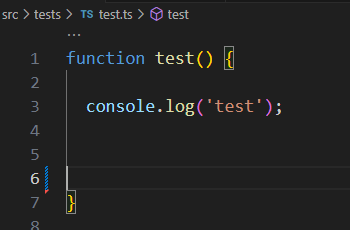
工程目录下新建test.ts
function test() {
  console.log('test')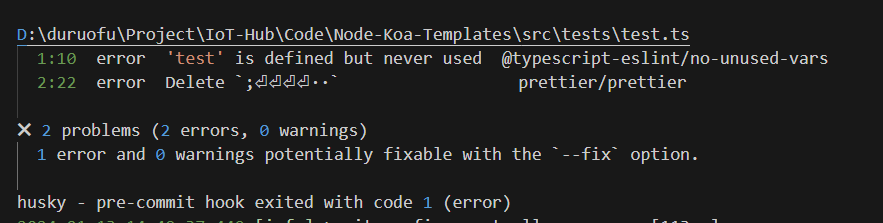
}运行脚本npm run lint 抛出错误: error 'test' is defined but never used 说明配置OK
5、配置Prettier代码格式化8
Prettier 是一个 Opinionated 的代码格式化工具。
安装:
npm i prettier -D在项目根目录下创建 .prettierrc 和 .prettierignore 文件 .prettierrc 配置如下
{
  "semi": false,
  "tabWidth": 2,
  "singleQuote": true,
  "trailingComma": "es5",
  "printWidth": 140
}semi: 设置为 false,表示不使用分号作为语句结束符。 tabWidth: 设置为 2,表示使用两个空格作为一个制表符的宽度。 singleQuote: 设置为 true,表示使用单引号而不是双引号来定义字符串。 trailingComma: 设置为 "es5",表示在对象或数组的最后一个元素之后> 允许添加逗号。 printWidth: 设置为 140,表示每行代码的最大宽度为 140 个字符。
.prettierignore 配置如下
build/
node_modules/
package-lock.json关于prettier的详细的配置项,可以查阅官网文档了解详细信息。
在package.json中新增执行prettier工具的脚本
 "scripts": {
      "format": "prettier --config .prettierrc . --write"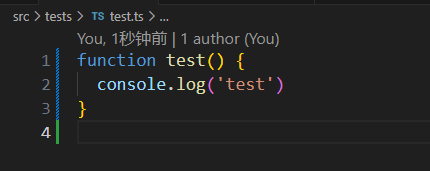
}测试:console.log('test');带有;号,不符合"semi": false配置项的规范
运行脚本npm run format 分号被格式化删除,说明配置OK
6、配置Prettier 和 Eslint 协同工作
Eslint既包含代码质量规则,也包含代码风格规则,当我们使用Prettier来对代码进行格式化时,Eslint的大部分代码风格的规则其实是不必要的,而且更糟糕的是,Eslint的代码风格的规则往往会跟Prettier发生冲突,所以我们需要应用一些Eslint的配置集来关闭与Prettier冲突或不必要的规则,并且将Prettier的规则转换为Eslint的规则,从而让Eslint能够完全按照我们的诉求向我们提供错误或警告信息。
在这里,会用上两个配置,分别为eslint-config-prettier 和 eslint-plugin-prettier,前者作用是关闭所有可能干扰 Prettier 规则的 ESLint 规则,确保将其放在最后,这样它有机会覆盖其他配置集,后者作用是将 Prettier 规则转换为 ESLint 规则。
安装:
npm i eslint-config-prettier eslint-plugin-prettier -D修改.eslintrc文件配置,添加
{
  "root": true,
  "parser": "@typescript-eslint/parser",
  "extends": [
    "eslint:recommended",
    "plugin:@typescript-eslint/recommended",
    "plugin:@typescript-eslint/eslint-recommended",
     //新增prettier项
    "prettier"
  ],
  //新增prettier插件
  "plugins": ["@typescript-eslint","prettier"]
 //新增rules
   "rules":{
    //打开eslint-plugin-prettier插件提供的规则,该插件从 ESLint 内运行 Prettier
    "prettier/prettier": "error",
    //关闭对应的这两个 ESLint 核心规则,这两个规则和prettier插件一起使用会出现问题
    "arrow-body-style": "off",
    "prefer-arrow-callback": "off"
}
}分别是extends prettier 配置,加载 prettier 插件,和添加三条rules,添加后如下
{
  //该配置项主要用于指示此.eslintrc文件是Eslint在项目内使用的根级别文件
  "root": true,
  //默认情况下,Eslint使用其内置的 Espree 解析器,该解析器与标准 JavaScript 运行时和版本兼容.而我们需要将ts代码解析为eslint兼容的AST,所以此处我们使用 @typescript-eslint/parser
  "parser": "@typescript-eslint/parser",
  //该配置项告诉eslint我们拓展了哪些指定的配置集
  "extends": [
    //该配置集是 ESLint 内置的“推荐”,它打开一组小的、合理的规则,用于检查众所周知的最佳实践
    "eslint:recommended",
    //该配置集是typescript-eslint的推荐,它与eslint:recommended相似,但它启用了特定于ts的规则
    "plugin:@typescript-eslint/recommended",
    //该配置集禁用 eslint:recommended 配置集中已经由 typeScript 处理的规则,防止eslint和typescript之间的冲突。
    "plugin:@typescript-eslint/eslint-recommended",
    //eslint-config-prettier配置集,这会关闭一些与 Prettier 冲突的 ESLint 规则
    "prettier"
  ],
  //该配置项指示要加载的插件
  // @typescript-eslint 插件使得我们能够在我们的存储库中使用typescript-eslint包定义的规则集
  // prettier该插件将 Prettier 规则转换为 ESLint 规则
  "plugins": ["@typescript-eslint", "prettier"],
  "rules": {
    //打开eslint-plugin-prettier插件提供的规则,该插件从 ESLint 内运行 Prettier
    "prettier/prettier": "error",
    //关闭对应的这两个 ESLint 核心规则,这两个规则和prettier插件一起使用会出现问题
    "arrow-body-style": "off",
    "prefer-arrow-callback": "off"
  }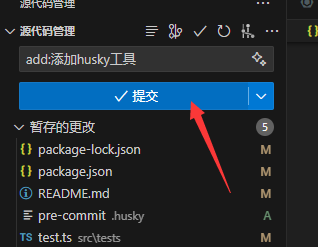
}7、配置Husky工具
git hooks是一些自定义的脚本,用于控制git工作的流程。git hooks 是本地的,不会被同步到 git 仓库里。为了保证每个人的本地仓库都能执行预设的 git hooks,于是就有了 husky。
Husky可以在项目中植入设定的 git hooks,在 git 提交代码的前后,预设的 git hooks 可以得到执行,以对代码、文件等进行预设的检查,一旦检查不通过,就可以阻止当前的代码提交,避免了不规范的代码和 git 提交出现在项目中。
安装:
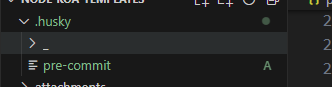
npm i -D husky初始化husky
npx husky install根目录会生成.husky文件
在package.json中新增脚本
"scripts": {
    "prepare": "husky install",
}这会使得,当其他人克隆该项目并安装依赖时会自动通过husky启用git hook
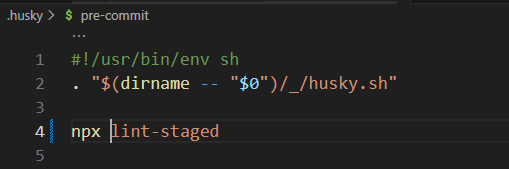
我们需要的第一个git hook是在提交commit之前执行我们的eslint工具对代码进行质量和格式检查,也就是在提交commit之前执行package.json中的lint脚本,我们通过husky命令来创建pre-commit这个git hook
npx husky add .husky/pre-commit "npm run lint".husky文件夹多出命令
测试:提交有格式错误的代码
成功抛出错误,提交被终止:
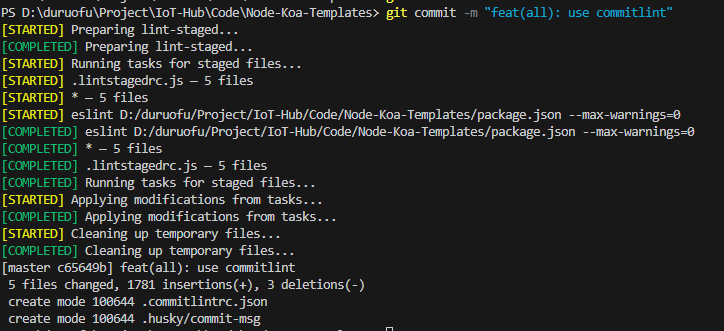
7、配置lint-staged工具
它的作用是仅对变更的文件执行相关操作,在这里,就是执行eslint检查这项操作,同时还能忽略我们所要忽略的文件。
安装:npm i -D lint-staged
创建 .lintstagedrc.js 配置文件
填充一下该配置文件
const { ESLint } = require('eslint');

const removeIgnoredFiles = async (files) => {
  const eslint = new ESLint();
  const ignoredFiles = await Promise.all(files.map((file) => eslint.isPathIgnored(file)));
  const filteredFiles = files.filter((_, i) => !ignoredFiles[i]);
  return filteredFiles.join(' ');
};

module.exports = {
  '*': async (files) => {
    const filesToLint = await removeIgnoredFiles(files);
    return [`eslint ${filesToLint} --max-warnings=0`];
  },
};该配置文件中的代码片段的含义是,对所有被lint-staged检测到的文件,其中过滤掉我们所需要忽略的文件,然后执行eslint脚本。
手动更改一下husky为我们创建的pre-commit这个git hook,将其变更为执行lint-staged命令(npx lint-staged),而不是直接执行package.json中的脚本。
8、配置commitlint,commitizen工具
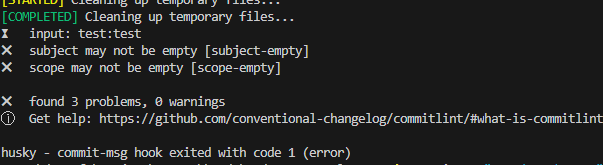
使用commitlint工具并搭配git hook从而在提交commit前对我们的commit message进行格式检查。
安装:npm i -D @commitlint/cli @commitlint/config-conventional 安装完成后,在项目根目录下创建配置文件 .commitlintrc.json,并向其中填入内容:
{
    "extends": ["@commitlint/config-conventional"],
    "rules": {
        "scope-empty": [2, "never"]
    }
}- "extends": ["@commitlint/config-conventional"] 的作用是直接拓展官方的预设配置,
- "rules": { "scope-empty": [2, "never"] }而这条规则是要求commit message的scope即范围不能为空
然后我们使用Husky添加 commit-msg的git hook,通过npx执行husky命令完成添加
npx husky add .husky/commit-msg 'npx --no -- commitlint --edit "$1"'作用是在我们提交commit或者修改commit-msg时对commit-msg执行相关校验,如此一来,我们就可以确保我们的项目拥有一个统一的符合规范的commit message。
示例:
错误提交信息会抛出错误:

正确提交信息不会抛出错误:
commitlint配置好了,下一步就是要引入commitizen来帮助我们便捷地创建符合commitlint规范的commit message
安装:npm i -D commitizen cz-conventional-changelog
安装好后,创建 .czrc 配置文件,并向文件中填入内容
{"path":"cz-conventional-changelog"}- cz-conventional-changelog是commitizen的 conventional-changelog 适配器,使用该适配器,commitizen将以AngularJS 的commit message规范逐步引导我们完成commit message的创建。
在package.json中新增脚本:cz
 "scripts": {
      "cz": "cz"
}使用脚本npm run cz即可执行commit message的创建。具体选项可参考https://juejin.cn/post/7024103006752735269

9、src下创建入口文件:app.ts
填充下面的内容:
import fs from 'fs';
import http from 'http';
import https from 'https';
import path from 'path';
import Koa from 'koa';
import koaBody from 'koa-body';
import Static from 'koa-static';
import { PORT } from './config/constant';
import { loggerMiddleware } from './middlewares/log';
import { errorHandler } from './middlewares/error';
import { responseHandler } from './middlewares/response';
import { getIpAddress } from './utils/util';
import router from './routers/index';

// 创建APP实例
const app = new Koa();

// 挂载日志中间件
app.use(loggerMiddleware);

// 挂载body解析中间件
app.use(koaBody({ multipart: true }));

// 挂载错误处理中间件
app.use(errorHandler);

// 挂载静态资源中间件
app.use(Static(path.join(__dirname + '/../public')));

// 路由挂载
app.use(router.routes()).use(router.allowedMethods());

// 挂载响应处理中间件
app.use(responseHandler);

//http 服务
const httpPort = PORT.http;
const httpServer = http.createServer(app.callback());
httpServer.listen(httpPort);
httpServer.on('error', (err: Error) => {
  console.log(err);
});
httpServer.on('listening', () => {
  const ip = getIpAddress();
  const address = `http://${ip}:${httpPort}`;
  const localAddress = `http://localhost:${httpPort}`;
  console.log(`app started at address:${localAddress} or ${address}`);
});

//https 服务
const httpsPort = PORT.https;
const ACoptions = {
  key: fs.readFileSync(path.resolve(__dirname, './assets/example.com.key')), // SSL私钥文件路径
  cert: fs.readFileSync(path.resolve(__dirname, './assets/example.com_bundle.crt')), // SSL证书文件路径
};
const httpsServer = https.createServer(ACoptions, app.callback());
httpsServer.listen(httpsPort);
httpsServer.on('error', (err) => {
  console.log(err);
});

httpsServer.on('listening', () => {
  const ip = getIpAddress();
  const address = `https://${ip}:${httpsPort}`;
  const localAddress = `https://localhost:${httpsPort}`;
  console.log(`app started at address:${localAddress} or ${address}`);
});10 、src下创建工具库文件夹:utils
utils文件夹下新增常用函数封装文件:util.ts:
import { Context } from 'vm'
import { JWT } from '../config/constant'
import jwt from 'jsonwebtoken'

/*获取当前ip地址*/
export const getIpAddress = () => {
  const interfaces = require('os').networkInterfaces()
  for (const devName in interfaces) {
    const temp = interfaces[devName]
    for (let i = 0; i < temp.length; i++) {
      const alias = temp[i]
      if (alias.family === 'IPv4' && alias.address !== '127.0.0.1' && !alias.internal) {
        return alias.address
      }
    }
  }
}
// 获取客户端ip地址
export const getClientIpAddress = (ctx: Context) => {
  const headers = ctx.headers
  if (headers['x-forwarded-for']) {
    const ipList = headers['x-forwarded-for'].split(',')
    return ipList[0]
  }
  return '0.0.0.0'
}11、src下新增配置文件夹:config
config文件夹下新增常用接口状态code:code.ts
这里随便写点作为示例,具体根据自己业务情况来写
//常用接口状态code
export const CODE = {
  success: { code: 0, message: 'success', key: 'success' },
  tokenFailed: { code: 1, message: 'token校验失败', key: 'tokenFailed' },
  missingParameters: { code: 2, message: '缺少参数', key: 'missingParameters' },
  adminUserIsExist: { code: 3, message: '账号名已存在', key: 'adminUserIsExist' },
};config文件夹下新增全局通用的配置参数文件:constant.ts
内容仅作为示例,按实际业务动态处理
// 环境变量配置
import { anyKeyObject } from "../type/global";

export const ENV = {
  development: "development",
  production: "production",
};

// mysql配置
export const DATABASE = {
  // 本地环境
  development: {
    dbName: "xxx",
    user: "root",
    password: "xxx",
    host: "xxx",
    port: 3306,
  },

  // 阿里云
  production: {
    dbName: "xxx",
    user: "root",
    password: "xxx",
    host: "xxx",
    port: 3306,
  },
};

// jsonwebtoken-jwt配置
export const JWT = {
  secret: "xxx", //密钥
  expires: 60 * 60 * 24 * 30, // 30天
};

// sms短信配置
export const SMS = {
  accessKeyId: "xxx",
  accessKeySecret: "xxx",
  signName: "xxx",
  templateCode: "xxx",
};

// 平台Map
export const PLATFORM = {
  wxMini: "微信小程序",
  wxH5: "微信H5",
  webH5: "webH5",
  dyMini: "抖音小程序",
  ksMini: "快手小程序",
  qqMini: "QQ小程序",
};

// 支付配置
export const PAY = {
  wx: {
    miniAppid: "xxx",
    h5Appid: "xxx",
    mchid: "xxx",
    v3Key: "xxx", //https://pay.weixin.qq.com/index.php/core/cert/api_cert#/api-password-v3
  },
};

// 支付方式配置
export const PAY_TYPE = [{ label: "微信小程序支付", value: 1 }];

// xxx
export const WX_MINI = {
  appid: "xxx",
  secret: "xxx",
};

// 全局参数
export const FIXED_KEY = {
  port: 3232,
};config文件夹下新增pm2配置文件:pm2.config.ts
const ENV = {
  development: "development",
  production: "production",
};

// eslint-disable-next-line no-undef
module.exports = {
  apps: [
    {
      name: "production", //需与package.json里--only 后缀名相同
      script: "./src/app.js",// 运营入口
      args: "one two",
      instances: 2,//cpu有几核开几个就行;我服务器是2核4g所以开了2个
      cron_restart: "0 03 * * *",//每天凌晨3点重启;
      autorestart: true,
      watch: false,
      min_uptime: "200s",
      max_restarts: 10,
      ignore_watch: [
        // 不用监听的文件
        "node_modules",
        ".idea",
        "log",
      ],
      max_memory_restart: "300M",//内存占用超过300M后重启
      restart_delay: "3000",
      env: {
        NODE_ENV: ENV.production, //process.env.NODE_ENV值
      },
    },
    {
      name: "test", //需与package.json里--only 后缀名相同
      script: "./src/app.js",
      args: "one two",
      instances: 1,
      cron_restart: "0 03 * * *",//每天凌晨3点重启;
      autorestart: true,
      watch: true,
      ignore_watch: [
        // 不用监听的文件
        "node_modules",
        ".idea",
        "log",
      ],
      max_memory_restart: "300M",
      env: {
        NODE_ENV: ENV.development, //process.env.NODE_ENV值
      },
    },
  ],
};12、src下新增中间件文件夹:middleware
日志记录中间件:log.ts
import Koa from 'koa';
import log4js from 'log4js';
import { getClientIpAddress } from '../utils/util';

log4js.configure({
  pm2: true,
  appenders: {
    everything: {
      type: 'dateFile',
      filename: 'logs\\log',
      pattern: 'yyyy-MM-dd.log',
      alwaysIncludePattern: true, // 设置文件名称为 filename + pattern
      keepFileExt: true,
      numBackups: 30, // 保留最近20个历史日志文件,可根据需求调整
      compress: true, // 压缩历史日志文件
    },
  },
  categories: {
    default: { appenders: ['everything'], level: 'debug' },
  },
});

export const logger = log4js.getLogger();
export const loggerMiddleware = async (ctx: Koa.Context, next: Koa.Next) => {
  // 请求开始时间
  const start = new Date();
  await next();
  // 结束时间
  const ms = Number(new Date()) - Number(start);
  // 打印出请求相关参数
  const remoteAddress = getClientIpAddress(ctx);
  const logText = `${ctx.method} ${ctx.status} ${ctx.url} 请求参数: ${JSON.stringify(ctx.request.body)} 响应参数: ${JSON.stringify(
    ctx.body
  )} - ${remoteAddress} - ${ms}ms`;
  logger.info(logText);
};返回统一出口中间件:response.ts
//返回统一出口中间件
import Koa from 'koa';
import { CODE } from '../config/code';

// 这个middleware用于将ctx.result中的内容最终回传给客户端

export const responseHandler = (ctx: Koa.Context) => {
  if (ctx.body !== undefined) {
    ctx.type = 'json';
    ctx.body = {
      code: CODE.success.code,
      data: ctx.body,
      message: CODE.success.message,
    };
  }
};13、业务流程实现
业务流程实现是最复杂的部分,设计到四个文件夹,分别是routers controllers services 和 prisma
13.1、src下创建路由文件夹:routers
routers目录下新建index.ts文件,用于自动路由挂载:
import fs from 'fs';
import path from 'path';
import Router from 'koa-router';
const router = new Router();

fs.readdirSync(__dirname).forEach((file) => {
  // console.log(file)
  if (file !== 'index.js') {
    import(path.join(__dirname, file))
      .then((r) => {
        router.use(r.default.routes());
      })
      .catch((error) => {
        // 处理导入错误
        console.log('路由自动加载错误' + error);
      });
  }
});
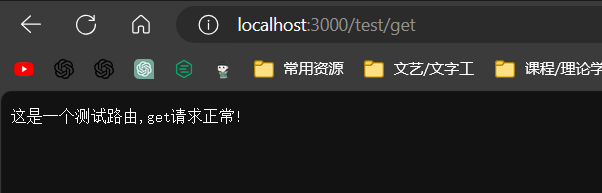
export default router;然后业务模块统一命名为:xxx.route.ts 下面展示一个最简单的路由范例:test.route.ts
//测试路由
import Router from 'koa-router';
const router = new Router({ prefix: '/test' });

// 增
router.post('/post', (ctx: any, next: any) => {
  console.log('测试路由:post');
  ctx.body = '这是一个测试路由,post请求正常!';
});

// 删
router.delete('/delete', (ctx: any, next: any) => {
  console.log('测试路由:delete');
  ctx.body = '这是一个测试路由,delete请求正常!';
});

// 查
router.get('/get', (ctx: any, next: any) => {
  console.log('测试路由:get');
  ctx.body = '这是一个测试路由,get请求正常!';
});

// 改
router.put('/update', (ctx: any, next: any) => {
  console.log('测试路由:put');
  ctx.body = '这是一个测试路由,put请求正常!';
});

export default router;此时将
app.ts缺少的依赖补上,运行主程序,能成功访问则,则确认路由部署成功。
下面我们展示一个基本的业务流程搭建,搭建一个example.route.ts模块
首先在路由文件夹建立example.route.ts,这里实现最简单的增删改查
//实例路由模块,该文件负责定义路由规则

import Router from 'koa-router';
const router = new Router({ prefix: '/example' });
import Controllers from '../controllers/example.controller';

// 增
router.post('/post', Controllers.post);

// 删
router.delete('/delete', Controllers.delete);

// 查
router.get('/get', Controllers.get);

// 改
router.put('/update', Controllers.put);

export default router;13.2、src下创建路由逻辑处理文件夹:controllers
刚才的example.route.ts中的
import Controllers from '../controllers/example.controller';就是将逻辑处理部分模块化到Controllers里了。
接着我们新建example.controller.ts,填充下面的内容:
//这个文件负责接口的业务逻辑
import ExampleService from '../services/example.service';

// 处理bigint类型的数据
function bigIntToString(value) {
  const MAX_SAFE_INTEGER = 2 ** 53 - 1;
  return value <= MAX_SAFE_INTEGER ? Number(value) : value.toString();
}

class ExampleController {
  //增
  async post(ctx: any, next: any) {
    // 获取数据
    const { Name, Password, Email, Phone } = ctx.request.body;
    // 数据验证

    // 操作数据库
    const res = await ExampleService.createExample(Name, Password, Email, Phone);

    // 返回数据
    const newRes = { ...res };
    if (typeof res.AccountId === 'bigint') newRes.AccountId = bigIntToString(res.AccountId);
    ctx.body = JSON.stringify(newRes);
  }

  //删
  async delete(ctx: any, next: any) {
    // 获取数据
    const { AccountId } = ctx.request.body;

    // 数据验证

    // 操作数据库
    const res = await ExampleService.deleteExample(AccountId);

    // 返回数据
    const newRes = { ...res };
    if (typeof res.AccountId === 'bigint') newRes.AccountId = bigIntToString(res.AccountId);
    ctx.body = JSON.stringify(newRes);
  }

  //查
  async get(ctx: any, next: any) {
    // 获取数据
    const { id } = ctx.request.body;

    // 数据验证

    // 操作数据库
    const res = await ExampleService.getExample(id);

    // 返回数据
    const newRes = { ...res };
    if (typeof res.AccountId === 'bigint') newRes.AccountId = bigIntToString(res.AccountId);
    ctx.body = JSON.stringify(newRes);
  }

  //改
  async put(ctx: any, next: any) {
    // 获取数据
    console.log(ctx.request.body);

    // 数据验证
    const { AccountId, Name, Password, Email, Phone } = ctx.request.body;

    // 操作数据库
    const res = await ExampleService.updateExample(AccountId, Name, Password, Email, Phone);

    // 返回数据
    const newRes = { ...res };
    if (typeof res.AccountId === 'bigint') newRes.AccountId = bigIntToString(res.AccountId);
    ctx.body = JSON.stringify(newRes);
  }
}

export default new ExampleController();这部分向下又涉及数据部分,所以我们先配置ORM环境
13.3 src下新增prisma数据库配置文件夹prisma
安装依赖:npm i prisma @prisma/client -D 使用npx prisma --help可以查看prisma 帮助,常用命令有下面这几个
| 命令 | 说明 |
|---|---|
| init | 在应用中初始化 Prisma |
| generate | 主要用来生成 Prisma Client |
| db | 管理数据库的模式和生命周期 |
| migrate | 迁移数据库 |
| studio | 启动一个Web 端的工作台来管理数据 |
| validate | 检查 Prisma 的模式文件的语法是否正确 |
| format | 格式化Prisma的模式文件,默认就是 prisma/schema.prisma |
首先我们初始化 Prisma,使用npx prisma init命令
这个命令的效果是在命令所在目录,创建一个 .env 文件,一个 prisma 目录,并在此目录下创建 schema.prisma 文件。这里我们把prisma目录移动到src目录下,.env保留在根目录。
.env 文件用于存放数据库连接信息,prisma 目录,用来存放和 Prisma 相关的文件,其中的schema.prisma 是使用 Primsa 的主要配置文件,称之为 Prisma schema 文件,它包含三个基本结构:
- 数据源
- 生成器
- 数据模型定义
这里可以安装
Prisma插件,增强schema.prisma文件的编辑体验。
prisma/schema.prisma配置如下
generator client {
  provider = "prisma-client-js"
}

datasource db {
  provider = "mysql"
  url      = env("DATABASE_URL")
}

model Example {

  AccountId   BigInt   @id @default(autoincrement()) @map("account_id")
  Name        String   @map("name")
  Password    String   @map("password")
  Email       String   @default("test@test.com") @map("email")
  Phone       String   @default("12312341234") @map("phone")
  IsDeleted   Boolean  @default(false) @map("is_deleted")
  CreatedTime DateTime @default(now()) @map("created_time")
  pdatedTime  DateTime @updatedAt @map("updated_time")

  @@map("example")
}
generator指定了要生成的 Prisma Client 为 JavaScript 语言。
datasource指定了数据库连接是 mysql 数据库,以及数据库配置信息。
Example是自定义的数据模型,对应数据库的一张表
.env 内容如下,配置数据库连接和数据库名称
DATABASE_URL=mysql://root:3.1415926@localhost:3306/example_db执行npx prisma migrate dev --name init 将数据库设计更新到真正的数据库 数据库已经自动生成符合的表结构。

下面我们基于这张表实现最基本的增删改查:
13.4 src下新建services文件夹
回忆一下Controllers模块里,我们把对数据库操作都封装到services层,所以我们新建services文件夹,其中example模块对应的数据操作文件命名为example.service.ts
内容:
import { PrismaClient } from '@prisma/client';
const prisma = new PrismaClient();

class ExampleService {
  // 增
  async createExample(Name: string, Password: string, Email: string, Phone: string) {
    const result = await prisma.example.create({
      data: {
        Name,
        Password,
        Email,
        Phone,
      },
    });
    return result;
  }

  // 删
  async deleteExample(AccountId: number) {
    const result = await prisma.example.delete({
      where: { AccountId },
    });
    return result;
  }

  // 改
  async updateExample(AccountId: number, Name: string, Password: string, Email: string, Phone: string) {
    const result = await prisma.example.update({
      where: { AccountId },
      data: {
        Name,
        Password,
        Email,
        Phone,
      },
    });
    return result;
  }

  // 查
  async getExample(AccountId) {
    const result = await prisma.example.findUnique({
      where: { AccountId },
    });
    return result;
  }
}

export default new ExampleService();上面就是针对数据库增删改查的操作,相较于传统的sql,要简单不少。
有关Prisma 的其他内容,自行查阅官方文档即可。
自此就实现了最基本的整套基础api服务。
14、配置Swagger用于生成文档
Swagger(目前用OpenAPI Specification代替)是一个用于设计、构建、记录和使用REST API的强大工具。通过使用Swagger,开发者可以定义API的结构,确保API的稳定性,并生成协作所需的文档。
安装依赖:npm install swagger-jsdoc swagger-ui-express --save
在中间件文件夹middlewares添加swagger.config.ts,内容如下
import path from 'path';
import swaggerJSDoc from 'swagger-jsdoc';
import AddressIp from 'ip';
import { PORT } from '../config/constant';

const swaggerDefinition = {
  info: {
    // API informations (required)
    title: 'Swagger接口文档', // Title (required)
    version: '1.0.0', // Version (required)
    description: 'Swagger接口文档', // Description (optional)
  },
  contact: {
    name: 'name',
    url: 'url',
  },
  host: `${AddressIp.address()}:${PORT.http}`, // Host (optional)
  basePath: '/', // Base path (optional)
  securityDefinitions: {
    token: {
      type: 'apiKey',
      name: 'authorization',
      in: 'header',
    },
  },
};

const options = {
  swaggerDefinition,
  apis: [path.join(__dirname, '/../routers/*.ts')], // all api
};

const jsonSpc = swaggerJSDoc(options);
export default jsonSpc;在路由文件夹新建swagger.route.ts文件,内容如下:
//koa集成swagger生成接口文档

import Router from 'koa-router';
import { Context } from 'koa';
import swaggerJSDoc from '../middlewares/swagger.config';
const router = new Router();

router.get('/docs', (ctx: Context) => {
  ctx.body = swaggerJSDoc;
});
export default router;在入口文件挂载路由即可
import { koaSwagger } from 'koa2-swagger-ui';

// 路由自动挂载
app.use(router.routes()).use(router.allowedMethods());

// 挂载swagger文档中间件
app.use(koaSwagger({ routePrefix: '/swagger', swaggerOptions: { url: '/docs' } }));之后访问对应路径就可看到对应在线文档了:
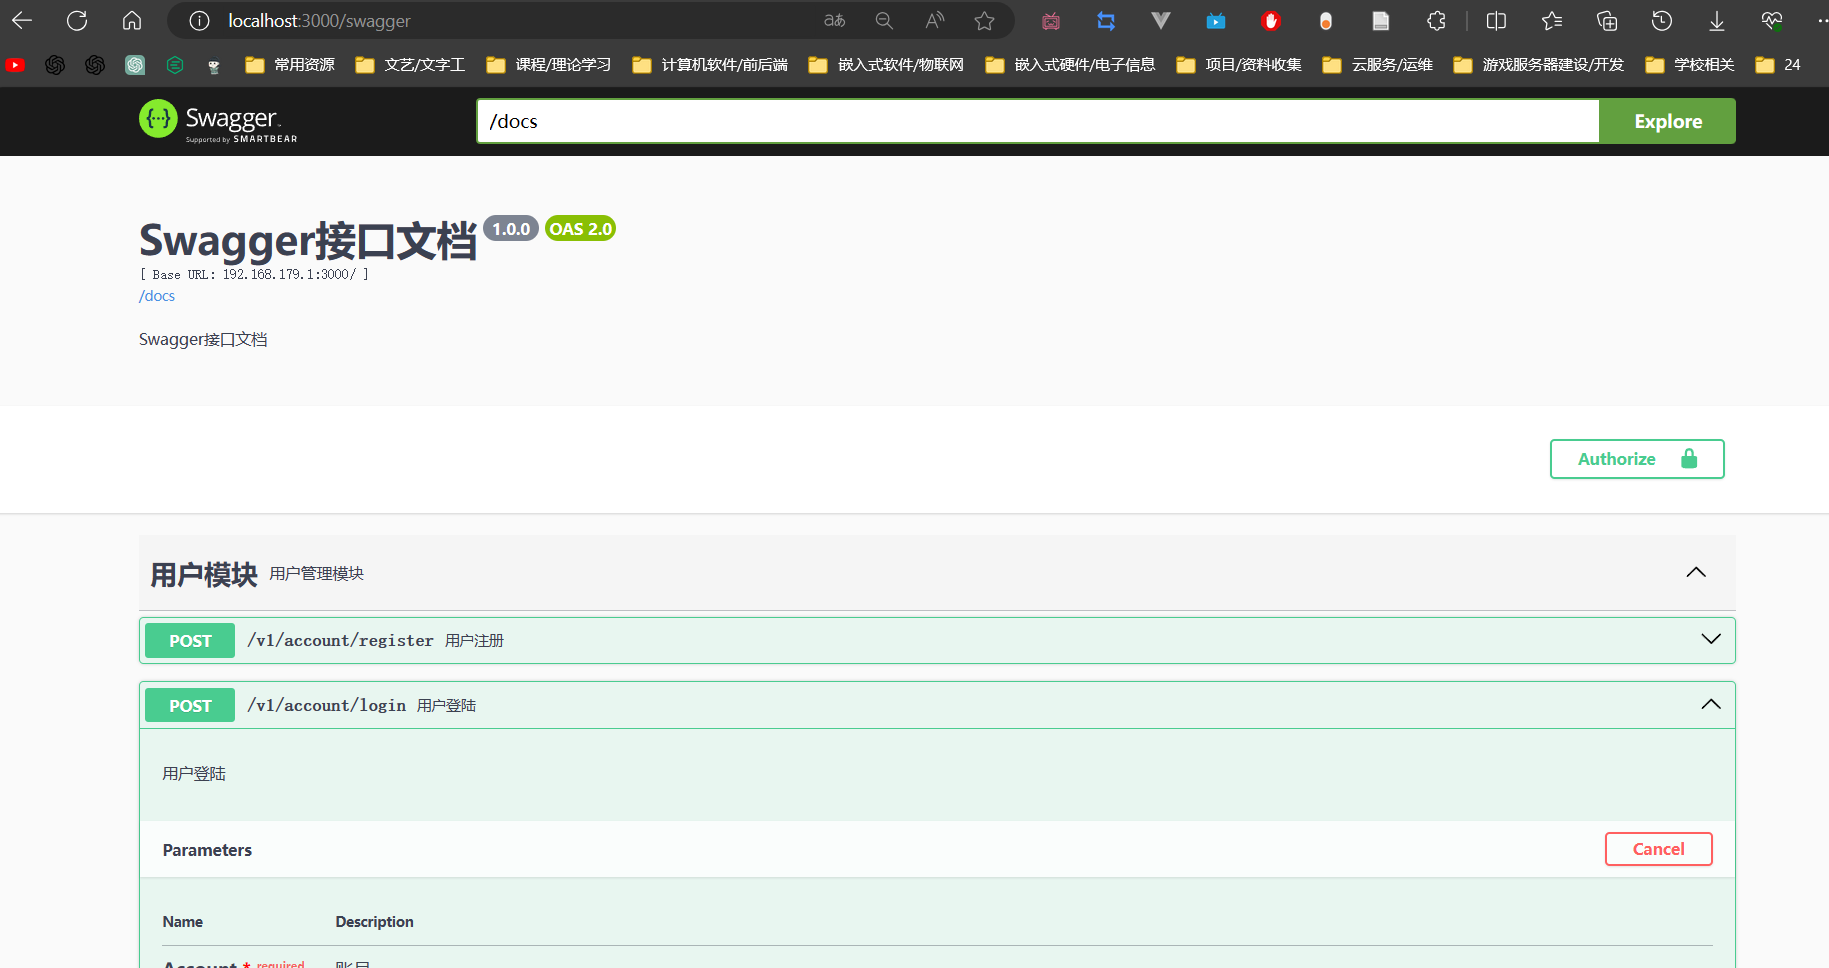
下面的API参数,通过编写注释实现,具体语法可参看Swagger官方文档,如下:
//#region 用户注册
/**
 * @swagger
 * /v1/account/register:
 *   post:
 *     summary: 用户注册
 *     description: 用户注册
 *     tags: [用户模块]
 *     produces:
 *     - application/json
 *     parameters: # 请求参数:
 *      - name: Account
 *        description: 账号
 *        in: formData
 *        required: true
 *      - name: Password
 *        description: 密码
 *        in: formData
 *        required: true
 *      - name: Email
 *        description: 邮箱
 *        in: formData
 *      - name: Phone
 *        description: 手机号
 *        in: formData
 *     responses:
 *       200:
 *         description: 用户注册成功
 *         schema:
 *          type: object
 *          properties:
 *           code:
 *             type: number
 *             description: 状态码
 *             example: 200
 *           massage:
 *             type: string
 *             description: 状态信息
 *             example: 用户注册成功
 *           data:
 *             type: object
 *             description: 用户信息
 */
// #endregion
router.post('/register', Controllers.register);有token鉴权的的路由需要在注释里加入security选型,如下;
//#region 获取用户列表
/**
 * @swagger
 * /v1/account/getAllAccount:
 *   get:
 *     summary: 查询用户列表
 *     description: 查询用户列表
 *     tags: [用户模块]
 *     responses:
 *       200:
 *         description: 查询用户列表成功
 *         schema:
 *          type: object
 *          properties:
 *           code:
 *             type: number
 *             description: 状态码
 *             example: 200
 *           massage:
 *             type: string
 *             description: 查询信息
 *             example: 查询用户列表成功
 *           data:
 *             type: object
 *             description: 用户列表信息
 *     security:
 *      - token: {}
 *      - server_auth:
 *        - authorization
 */
// #endregion最后:需要将跨域中间件置于jwt认证中间键之前,不然swagger请求会出现跨域错误
// 创建APP实例
const app = new Koa();

// 挂载错误处理中间件
app.use(errorHandler);

// 挂载日志中间件
app.use(loggerMiddleware);

// 挂载跨域中间件
app.use(Cors(corsHandler));

// 挂载jwt中间件
app.use(Jwtauth);

// 挂载body解析中间件
app.use(koaBody({ multipart: true }));

// 挂载参数校验中间件
app.use(parameter(app));

// 挂载静态资源中间件
app.use(Static(path.join(__dirname + '/../public')));

// 路由自动挂载
app.use(router.routes()).use(router.allowedMethods());

// 挂载swagger文档中间件
app.use(koaSwagger({ routePrefix: '/swagger', swaggerOptions: { url: '/docs' } }));

// 挂载响应处理中间件
app.use(responseHandler);15、安装koa-parameter 进行路由参数校验
安装依赖npm install koa-parameter --save 用法
const Koa = require('koa');
const parameter = require('koa-parameter');

const app = new Koa();

parameter(app); // add verifyParams method, but don't add middleware to catch the error
// app.use(parameter(app)); // also add a middleware to catch the error.

app.use(async function (ctx) {
  ctx.verifyParams({
    name: 'string'
  });
});在路由处理函数中使用添加 ctx.verifyParams数据校验即可
class AccountController {
  //用户注册
  async register(ctx: any, next: any) {
    // 获取数据
    const { Name, Password, Email, Phone } = ctx.request.body;
    // 数据校验
    ctx.verifyParams({
      Name: {
        type: 'string',
        required: true,
      },
      Password: {
        type: 'string',
        required: true,
      },
      Email: {
        type: 'string',
        required: false,
      },
      Phone: {
        type: 'string',
        required: false,
      },
    });

// 操作数据库16、进行JWT鉴权
使用jsonwebtoken包实现,安装依赖npm i jsonwebtoken
登陆时,登陆成功返回token,
tsconst token = 'Bearer ' + sign({ AccountId: newRes.AccountId }, JWT.secret, { expiresIn: JWT.expires }); // 返回数据 ctx.body = { code: 0, msg: '用户登录成功', data: { token: token }, };自定义JWT拦截器(这里没使用koa-jwt是因为在使用它时老出现莫名其妙的错误)、
在中间件文件夹
middlewares添加jwt.ts,内容如下tsimport { verify } from 'jsonwebtoken'; import { JWT } from '../config/constant'; import Koa from 'koa'; import { TOKEN_EXPIRED, TOKEN_INVALID } from '../config/code/responseCode'; import { PublicRouter } from '../config/constant'; export const Jwtauth = async (ctx: Koa.Context, next: Koa.Next) => { // 检查当前请求的路径,如果匹配指定的路由,则跳过认证 if (checkIgnore(ctx.path)) { await next(); return; } const { authorization = '' } = ctx.request.header; const token = authorization.replace('Bearer ', ''); // console.log(token) try { // user中包含了payload的信息(id) const user = verify(token, JWT.secret); ctx.state.user = user; } catch (err) { switch (err.name) { // token过期 case 'TokenExpiredError': return await TOKEN_EXPIRED(ctx); // token错误 case 'JsonWebTokenError': return await TOKEN_INVALID(ctx); } } await next(); }; // 判断是否应该跳过认证的辅助函数 function checkIgnore(path: string): boolean { // 在这里添加需要跳过认证的路由规则 const ignoreRoutes = PublicRouter; return ignoreRoutes.some((route) => route.test(path)); }这里的
PublicRouter在配置文件里如下ts// 公共路由(不用jwt验证) export const PublicRouter = [/\/swagger/, /\/docs/, /^\/public/, /\/account\/login/, /\/account\/register/, /\/favicon\.png/];
17、添加错误处理中间件:
在config下新建code目录,定义返回状态,添加下列文件
errCode.ts
import Koa from 'koa';
export class ErrorModel {
  code: number;
  msg: string;
  statusCode: number;
  constructor(code = 500, msg = '未知服务器错误', statusCode = 500) {
    this.code = code; //data携带的内部异常状态码
    this.msg = msg; // 消息
    this.statusCode = statusCode; //外层的状态码
  }
  throwErr(ctx: Koa.Context) {
    //抛出错误
    ctx.throw(this.statusCode, this.msg, {
      code: this.code,
      flag: 'ErrorModel',
    });
  }
}
// 400参数错误
export class ParameterError extends ErrorModel {
  constructor(code, msg = '请求错误') {
    super(code, msg, 400);
  }
}
// 401错误
export class AuthError extends ErrorModel {
  constructor(code, msg = 'token认证失败') {
    super(code, msg, 401);
  }
}
// 404
export class NotFoundError extends ErrorModel {
  constructor(code, msg = '未找到该api') {
    super(code, msg, 404);
  }
}
// 500
export class InternalServerError extends ErrorModel {
  constructor(code, msg = '服务器内部错误') {
    super(code, msg, 500);
  }
}successCode.ts
import Koa from 'koa';
class SuccessModel {
  code: number;
  msg: any;
  data?: any;
  constructor(code, msg, data?) {
    this.code = code || 200;
    this.msg = msg || '操作成功';
    if (data) {
      this.data = data;
    }
  }
  success(ctx: Koa.Context) {
    // 所有的响应都是json,koa处理好的方式,直接用
    ctx.body = this;
  }
}

export default SuccessModel;responseCode.ts
import SuccessModel from './successCode';
import { ParameterError, AuthError, NotFoundError, InternalServerError } from './errCode';
import Koa from 'koa';

// 200 请求成功
const SUCCESS = async (ctx: Koa.Context, data, msg) => new SuccessModel(200, msg, data).success(ctx);
// 权限限制
const USER_NO_PERMISSION = async (ctx: Koa.Context, msg = '没有权限') => new SuccessModel(2100, msg).success(ctx);
// 用户错误
const USER_NOT_LOGIN = async (ctx: Koa.Context) => new SuccessModel(2001, '用户未登录').success(ctx);
const USER_ACCOUNT_EXPIRED = async (ctx: Koa.Context) => new SuccessModel(2002, '账号已过期').success(ctx);
const USER_ACCOUNT_DISABLE = async (ctx: Koa.Context) => new SuccessModel(2003, '账号不可用').success(ctx);
const USER_ACCOUNT_NOT_EXIST = async (ctx: Koa.Context) => new SuccessModel(2004, '账号不存在').success(ctx);
const USER_ACCOUNT_ALREADY_EXIST = async (ctx: Koa.Context, msg = '账号已存在') => new SuccessModel(2005, msg).success(ctx);
const USER_ACCOUNT_USE_BY_OTHERS = async (ctx: Koa.Context) => new SuccessModel(2006, '账号下线').success(ctx);
const USER_PWD_ERROR = async (ctx: Koa.Context) => new SuccessModel(2007, '密码错误').success(ctx);

// 400
const PARAM_NOT_VALID = async (ctx: Koa.Context, msg = '请求参数无效') => new ParameterError(1001, msg).throwErr(ctx);
const PARAM_IS_BLANK = async (ctx: Koa.Context, msg = '请求参数为空') => new ParameterError(1002, msg).throwErr(ctx);
const PARAM_TYPE_ERROR = async (ctx: Koa.Context, msg = '请求参数类型错误') => new ParameterError(1003, msg).throwErr(ctx);
const PARAM_NOT_COMPLETE = async (ctx: Koa.Context, msg = '请求参数缺失') => new ParameterError(1004, msg).throwErr(ctx);
// 401
export const TOKEN_IS_BLANK = async (ctx: Koa.Context) => new AuthError(4004, 'token为空').throwErr(ctx);
export const TOKEN_EXPIRED = async (ctx: Koa.Context) => new AuthError(4001, 'token过期').throwErr(ctx);
export const TOKEN_INVALID = async (ctx: Koa.Context) => new AuthError(4002, 'token无效').throwErr(ctx);
export const AUTHENTICATION_FAIL = async (ctx: Koa.Context, msg = '认证失败') => new AuthError(4003, msg).throwErr(ctx);
// 404
export const NotFound = async (ctx: Koa.Context) => new NotFoundError(404, '未找到api,请检查请求路径以及请求方法是否出错').throwErr(ctx);

// 500
const FAIL = async (ctx: Koa.Context, msg) => new InternalServerError(500, msg).throwErr(ctx);
const FILE_UPLOAD_FAIL = async (ctx: Koa.Context) => new InternalServerError(5001, '文件上传失败').throwErr(ctx);

//参考链接:https://juejin.cn/post/6847902223138029581responseCode.ts里就是我们返回消息或抛出错误直接使用的接口,使用下面的方式就可以在任意位置抛出错误:
// 404
app.use(async (ctx, next) => {
    // 抛出404
	await NotFound(ctx)
})最后,在中间件文件夹添加error.ts
// 错误处理中间件
import { ErrorModel } from '../config/code/errCode';

export const errorHandler = async (ctx, next) => {
  try {
    await next();
  } catch (err) {
    //判断是否为已知错误
    if (err.flag === 'ErrorModel') {
      format(err, ctx);
    } else {
      //对于未知的错误返回统一的消息
      format(new ErrorModel(), ctx);
    }
  }
};

// 格式化错误响应
const format = (err: any, ctx: any) => {
  ctx.status = err.statusCode;
  ctx.body = {
    code: err.code,
    msg: err.message || err.msg,
    request: ctx.method + ' >> ' + ctx.url,
  };
};18.添加权限认证系统
添加依赖:
npm install casbin casbin-prisma-adapter --save
详细内存请参考Node-Koa-Templates鉴权设计文档
19、src下新增测试文件夹:tests
用于单元测试
20、跟目录下新增脚本文件夹:script
用于定义一些开发脚本
其他参考
- https://www.bilibili.com/video/BV1UM4y1T7QF/?spm_id_from=333.1007.top_right_bar_window_custom_collection.content.click&vd_source=ef5a0ab0106372751602034cdd9ab98e
- https://juejin.cn/post/7231152303583100988#heading-5
- https://www.baasapi.com/blog/prisma
- https://juejin.cn/post/6847902223138029581
- https://www.bilibili.com/video/BV1d64y1Y7Cg?p=11&vd_source=ef5a0ab0106372751602034cdd9ab98e