说明:
- 由于之前使用hexo的博客有些臃肿,并且在文字分类和系统性管理方面做的不太好,在旧博客使用的两三年里,我发现自己并不需要太多动态互动的功能,仅仅是需要一个更加系统的笔记系统。
- VitePress是这方面比较合适的,故重新将博客迁移到VitePress,在此记录搭建细节,方便后续优化更改回忆。
VitePress是什么
VitePress 是一个静态站点生成器 (SSG),专为构建快速、以内容为中心的站点而设计。简而言之,VitePress 获取用 Markdown 编写的内容,对其应用主题,并生成可以轻松部署到任何地方的静态 HTML 页面。
具体可参考官方文档:VitePress 是什么?
搭建项目
新建目录,并初始化项目:
mkdir blog && cd blog && npm init安装vitepress:
pnpm add -D vitepress初始化vitepress:
npx vitepress init需要回答下面几个简单的问题,根据自己的需求配置即可:
T  Welcome to VitePress!
|
o  Where should VitePress initialize the config?
|  ./
|
o  Site title:
|  blog
|
o  Site description:
|  A VitePress Site
|
o  Theme:
|  Default Theme
|
o  Use TypeScript for config and theme files?
|  Yes
|
o  Add VitePress npm scripts to package.json?
|  Yes
|
— Done! Now run npm run docs:dev and start writing.生成目录结构如下:
┌── .vitepress
│  │  └─ config.mts(全局配置)
├── api-examples.md
├── index.md
├── markdown-examples.md
├── node_modules/(这是一个由 npm 管理的依赖项目录,通常包含很多子目录和文件)
├── pnpm-lock.yaml(pnpm 自动生成的,用于锁定安装时的包版本)
└── package.json(项目的配置文件,包含项目的元数据、依赖项等信息)运行:
pnpm run docs:dev效果如下:
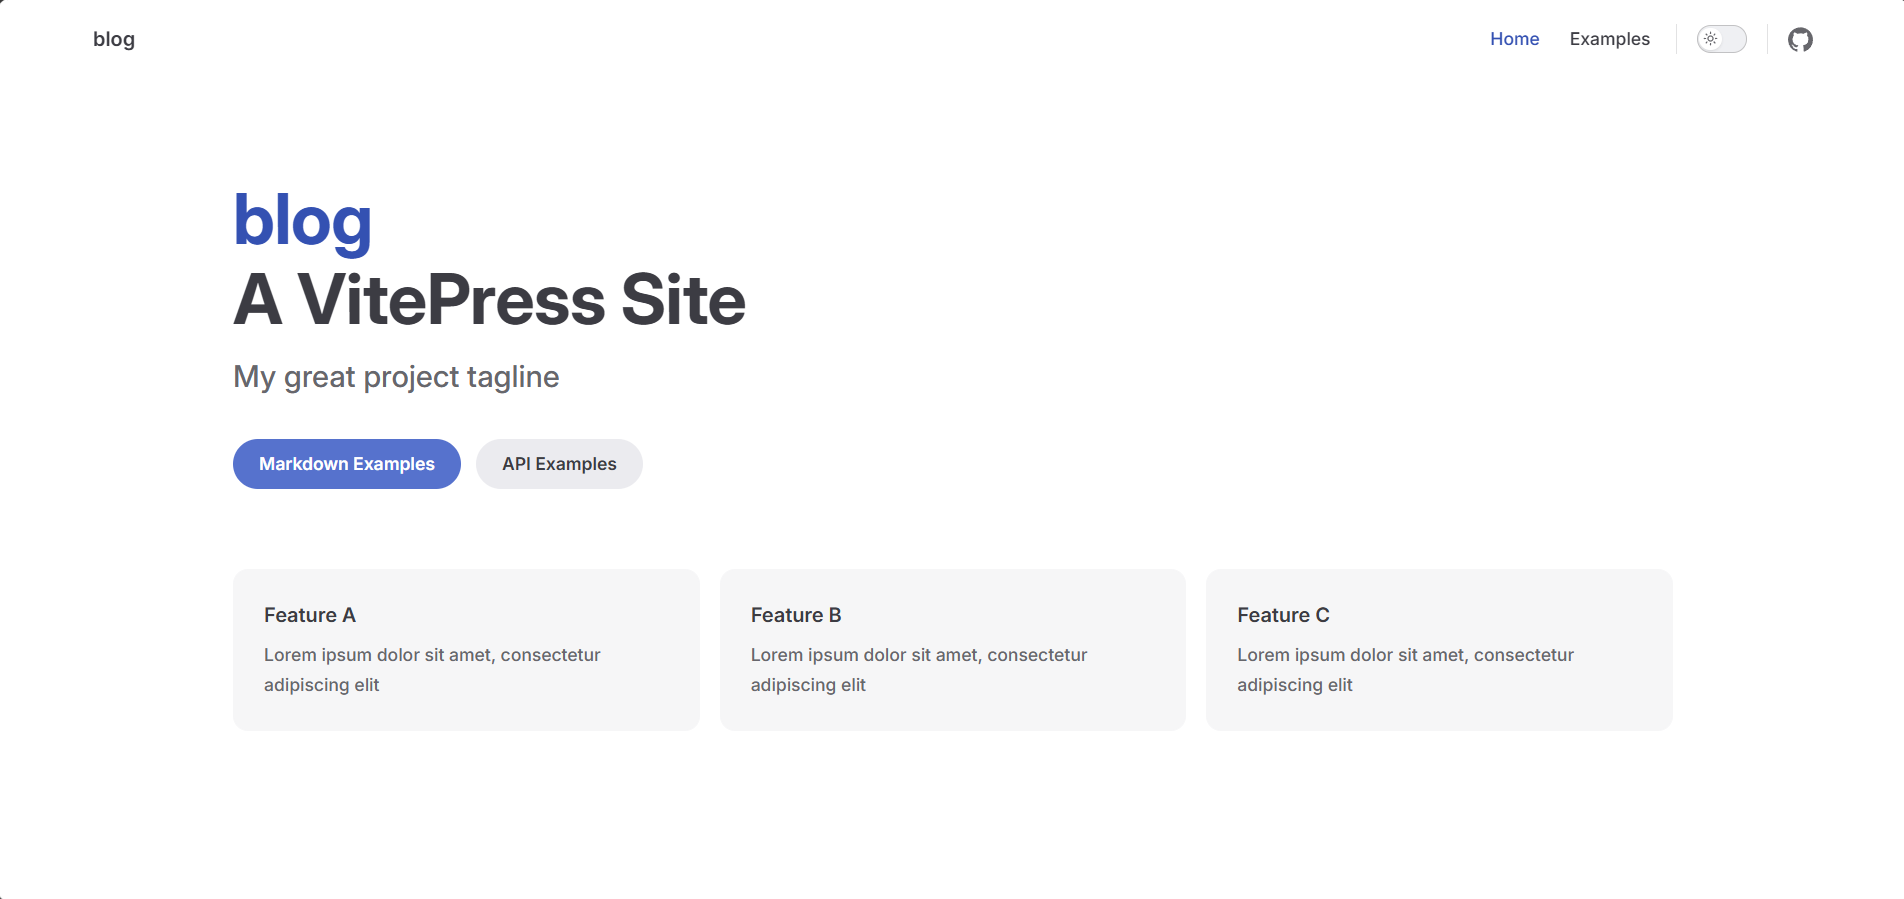
至此基本的项目就搭起来了。
项目配置
1. 网站基础配置
下面是默认配置文件的注释:
import { defineConfig } from 'vitepress'

// 使用 defineConfig 定义 VitePress 的配置
export default defineConfig({
  // 网站的标题
  title: "blog",

  // 网站的描述,通常用于 SEO 和元数据
  description: "A VitePress Site",

  // 主题配置部分
  themeConfig: {
    // 导航栏配置
    nav: [
      { text: 'Home', link: '/' }, // 首页导航项
      { text: 'Examples', link: '/markdown-examples' } // 示例页面导航项
    ],

    // 侧边栏配置
    sidebar: [
      {
        text: 'Examples', // 侧边栏分组标题
        items: [
          { text: 'Markdown Examples', link: '/markdown-examples' }, // Markdown 示例页面
          { text: 'Runtime API Examples', link: '/api-examples' } // API 示例页面
        ]
      }
    ],

    // 社交链接配置
    socialLinks: [
      { icon: 'github', link: 'https://github.com/vuejs/vitepress' } // GitHub 链接
    ]
  }
})可以通过 themeConfig 选项配置主题的行为。有关所有配置选项的完整详细信息,请参见配置参考。
下面简单修改默认配置:
import { defineConfig } from 'vitepress'

// 使用 defineConfig 定义 VitePress 的配置
export default defineConfig({
  // 网站的标题
  title: "Duruofu's 个人测试",

  // 网站的描述,通常用于 SEO 和元数据
  description: "Duruofu的个人博客, 用于测试",

  // 网站头部设置
  head: [['link', { rel: 'icon', href: '/favicon.ico' }]],
  // 主题配置部分
  themeConfig: {
    //logo设置
    logo: "/logo.png",
    siteTitle: "Duruofu's blog",
    //网站底部设置
    footer: {
      //底部信息
      message: '<a href="https://beian.miit.gov.cn/#/Integrated/index">陕ICP备2022007454号-2</a>',
      //底部版权
      copyright: " Copyright © 2023 - DuRuofu.All Rights Reserved. ",
    },
    //本地搜索
    search: {
      provider: 'local'
    },
    // 导航栏配置
    nav: [
      { text: 'Home', link: '/' }, // 首页导航项
      { text: 'Examples', link: '/docs/markdown-examples' } // 示例页面导航项
    ],

    // 侧边栏配置
    sidebar: [
      {
        text: 'Examples', // 侧边栏分组标题
        items: [
          { text: 'Markdown Examples', link: '/docs/markdown-examples' }, // Markdown 示例页面
          { text: 'Runtime API Examples', link: '/docs/api-examples' } // API 示例页面
        ]
      }
    ],

    // 社交链接配置
    socialLinks: [
      { icon: 'github', link: 'https://github.com/vuejs/vitepress' } // GitHub 链接
    ],
    //更新时间
    lastUpdated: {
      text: 'Updated at',
      formatOptions: {
        dateStyle: 'full',
        timeStyle: 'medium'
      }
    },
    //手机端配置返回顶部按钮显示文字
    returnToTopLabel: "返回顶部",
    //手机端配置侧边栏菜单按钮显示文字
    sidebarMenuLabel: "菜单",
    //右侧内容导航栏
    outline: {
      level: [2, 6],
      label: "导航"
    },
    //翻页
    docFooter: {
      prev: "上一页",
      next: "下一页",
    },
  }
})修改后对应的文件资源目录如下:
┌── .vitepress
│  │  └─ config.mts(全局配置)
├── docs(这里存放md文件)
│  ├── api-examples.md
│  ├── markdown-examples.md
├── node_modules/
├── public
│  ├── favicon.ico
│  ├── logo.png
├── index.md
├── package-lock.json
└── package.json效果如下:

2. 网站首页配置
网站的首页位于根目录下的index.md,默认内容如下:
---
# https://vitepress.dev/reference/default-theme-home-page
layout: home

hero:
  name: "blog"
  text: "A VitePress Site"
  tagline: My great project tagline
  actions:
    - theme: brand
      text: Markdown Examples
      link: /markdown-examples
    - theme: alt
      text: API Examples
      link: /api-examples

features:
  - title: Feature A
    details: Lorem ipsum dolor sit amet, consectetur adipiscing elit
  - title: Feature B
    details: Lorem ipsum dolor sit amet, consectetur adipiscing elit
  - title: Feature C
    details: Lorem ipsum dolor sit amet, consectetur adipiscing elit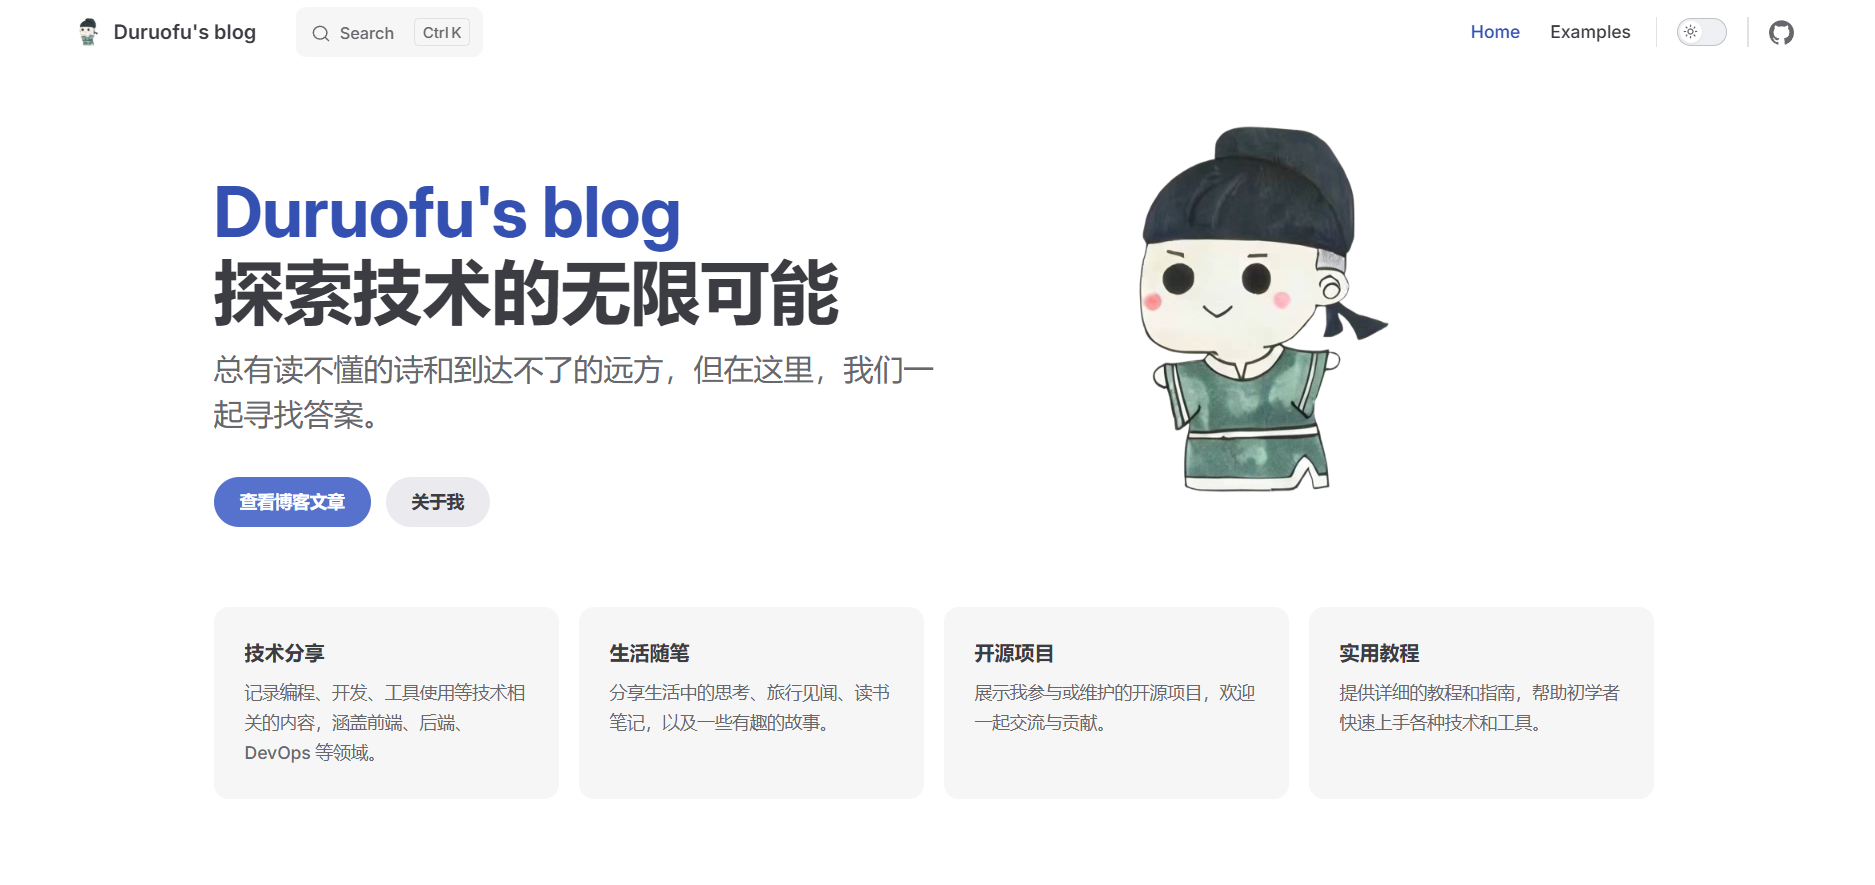
---可以根据自己的需求进行修改,我这里修改如下:
---
layout: home

hero:
  name: "Duruofu's blog"
  text: "探索技术的无限可能"
  tagline: "总有读不懂的诗和到达不了的远方,但在这里,我们一起寻找答案。"
  image:
    src: /logo.png
    alt: 背景图
  actions:
    - theme: brand
      text: 查看博客文章
      link: /blog
    - theme: alt
      text: 关于我
      link: /about

features:
  - title: 技术分享
    details: 记录编程、开发、工具使用等技术相关的内容,涵盖前端、后端、DevOps 等领域。
  - title: 生活随笔
    details: 分享生活中的思考、旅行见闻、读书笔记,以及一些有趣的故事。
  - title: 开源项目
    details: 展示我参与或维护的开源项目,欢迎一起交流与贡献。
  - title: 实用教程
    details: 提供详细的教程和指南,帮助初学者快速上手各种技术和工具。
---效果如下:
3. 自定义样式
在.vitepress新增theme目录并且在 theme 目录下新建 index.ts 和 custom.css,
┌── .vitepress
│  │  └─ config.mts(全局配置)
│  │  └─ theme(主题配置)
│  │     └─ custom.css
│  │     └─ index.ts (主题配置)
├── docs(这里存放md文件)
│  ├── api-examples.md
│  ├── markdown-examples.md
├── node_modules/
├── public
│  ├── favicon.ico
│  ├── logo.png
├── index.md
├── package-lock.json
└── package.json可以通过在custom.css里覆盖根级别的 CSS 变量来自定义默认主题的 CSS:
index.ts:
import DefaultTheme from 'vitepress/theme-without-fonts'
import './my-fonts.css'

export default DefaultThemecustom.css :
/* .vitepress/theme/custom.css */
:root {
  /* hero标题渐变色 */
  --vp-home-hero-name-color: transparent;
  --vp-home-hero-name-background: -webkit-linear-gradient(120deg, #bd34fe, #41d1ff);

}这里随便修改一下,给标题加上渐变色,效果如下:
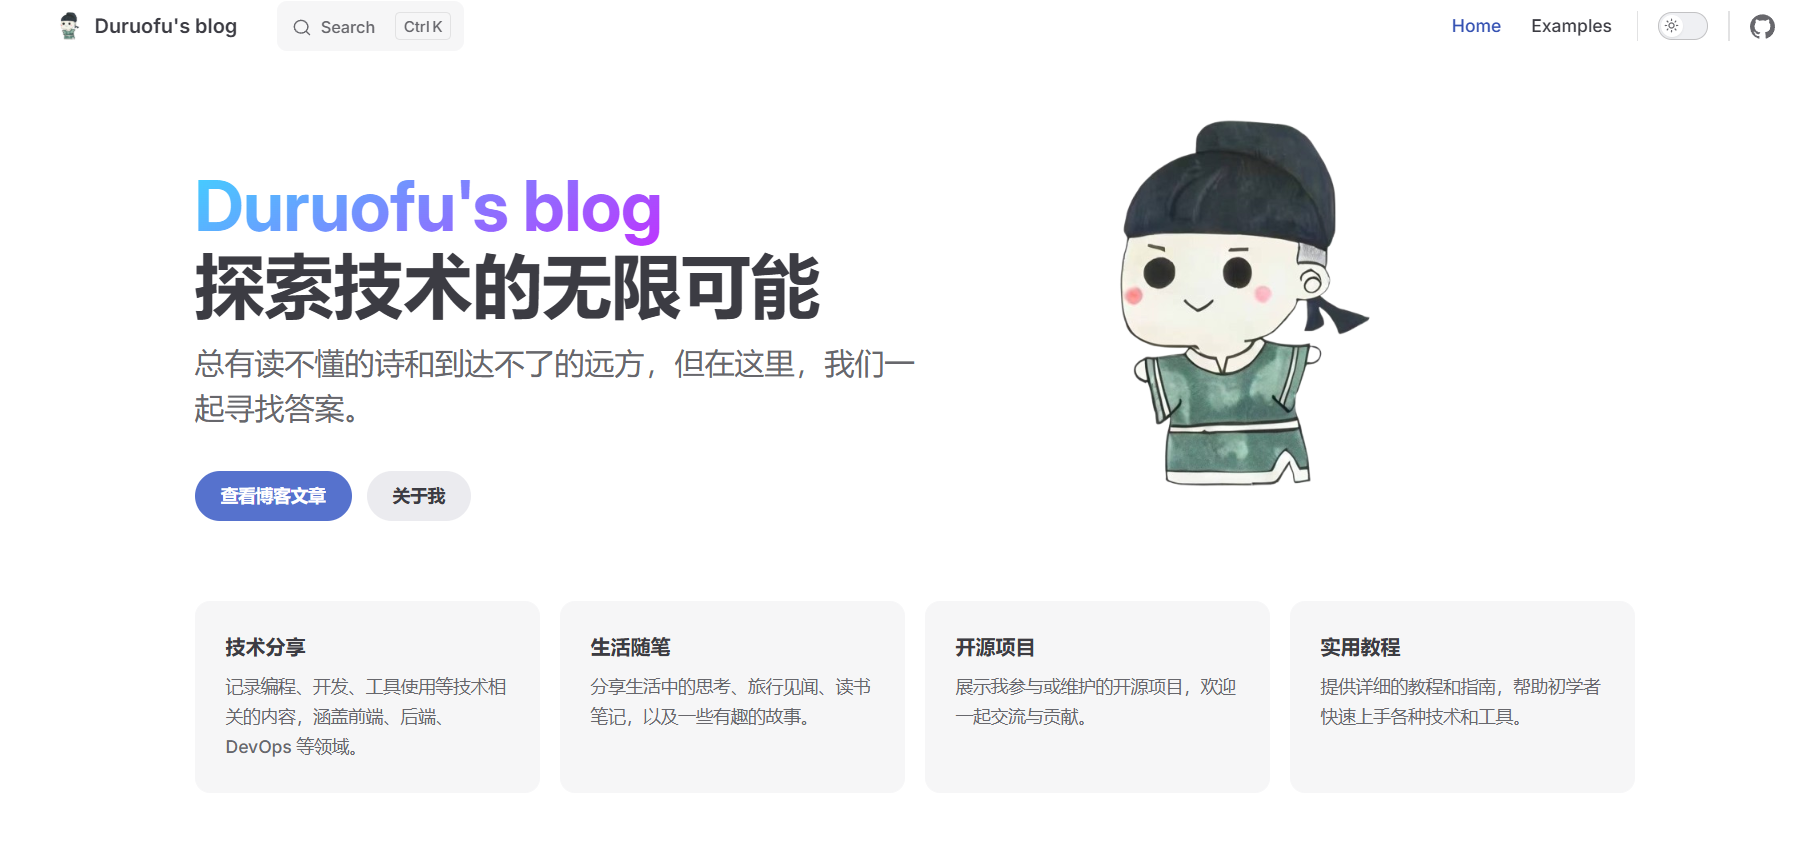
可以进一步查看默认主题 CSS 变量来获取可以被覆盖的变量。
4. 自动生成侧边栏
使用插件:VitePress Sidebar
安装插件:
pnpm i -D vitepress-sidebar在 .vitepress/config.mts 中引入以下代码
import { generateSidebar } from "vitepress-sidebar";然后在下方的themeConfig中添加使用函数:
themeConfig: {
sidebar: generateSidebar({
    // 侧边栏的根目录,默认为docs
    documentRootPath: "/my-blog/docs",
    // 使用h1的标题作为侧边栏的标题
    useTitleFromFileHeading: true,
    // 使用文件夹的index.md
    useFolderTitleFromIndexFile: true,
    // 指向文件夹的链接
    useFolderLinkFromIndexFile: true,
    // 根据md文件的order进行排序
    sortMenusByFrontmatterOrder: true,
    // 排序之后将不是文件夹的放后面
    sortFolderTo: "top",
    // 菜单展开功能
    collapsed: false,
}),
}然后重新启动一下项目,即可看到自动生成的侧边栏。
但如果希望目录能进一步的自定义,还是手动设置会更灵活一些。
5. 图片点击放大、预览
插件地址: https://github.com/T-miracle/vitepress-plugins
效果(点击图片测试):

使用:
在 .vitepress/theme/index 中
import DefaultTheme from 'vitepress/theme';
import 'viewerjs/dist/viewer.min.css';
import imageViewer from 'vitepress-plugin-image-viewer';
import vImageViewer from 'vitepress-plugin-image-viewer/lib/vImageViewer.vue';
import { useRoute } from 'vitepress';

export default {
    ...DefaultTheme,
    enhanceApp(ctx) {
        DefaultTheme.enhanceApp(ctx);
        // 注册全局组件,如果你不想使用也可以不添加
        ctx.app.component('vImageViewer', vImageViewer);
        // ...
    },
    setup() {
        // 获取路由
        const route = useRoute();
        // 使用
        imageViewer(route);
    }
};还可以使用插件的扩展组件vImageViewer,vImageViewer 组件能编译成一个按钮,点击这个按钮能弹出图片,使用方式如下:
<vImageViewer src="图片地址" alt="描述内容" :inline="false"/>效果如下:

项目部署
项目部署可以参考官方文档:部署 VitePress 站点
我这里简单使用github action部署到自己的服务器:
在项目的 .github/workflows 目录中创建一个名为 deploy.yml 的文件,其中包含这样的内容:
name: Deploy VitePress site
on:
  push:
    branches: [main]
  workflow_dispatch:

permissions:
  contents: write
  pages: write
  id-token: write

concurrency:
  group: pages
  cancel-in-progress: false

jobs:
  build:
    runs-on: ubuntu-latest
    steps:
      - name: Checkout Source Repository
        uses: actions/checkout@v4
        with:
          fetch-depth: 0

      - uses: pnpm/action-setup@v3
        with:
          version: 9

      - name: Setup Node
        uses: actions/setup-node@v4
        with:
          node-version: 20
          cache: pnpm

      - name: Install dependencies
        run: pnpm install

      - name: Build with VitePress
        run: pnpm run docs:build

      - name: Transfer files to cloud server
        uses: appleboy/scp-action@master
        with:
          host: ${{ secrets.SERVER_HOST }}  # 替换为您的云服务器主机名或IP地址
          username: ${{ secrets.SERVER_USERNAME }}  # 替换为您的云服务器用户名
          password: ${{ secrets.SERVER_PASSWORD }}  # 替换为您的云服务器密码
          port: 22  # 替换为您的云服务器端口
          source: ".vitepress/dist/"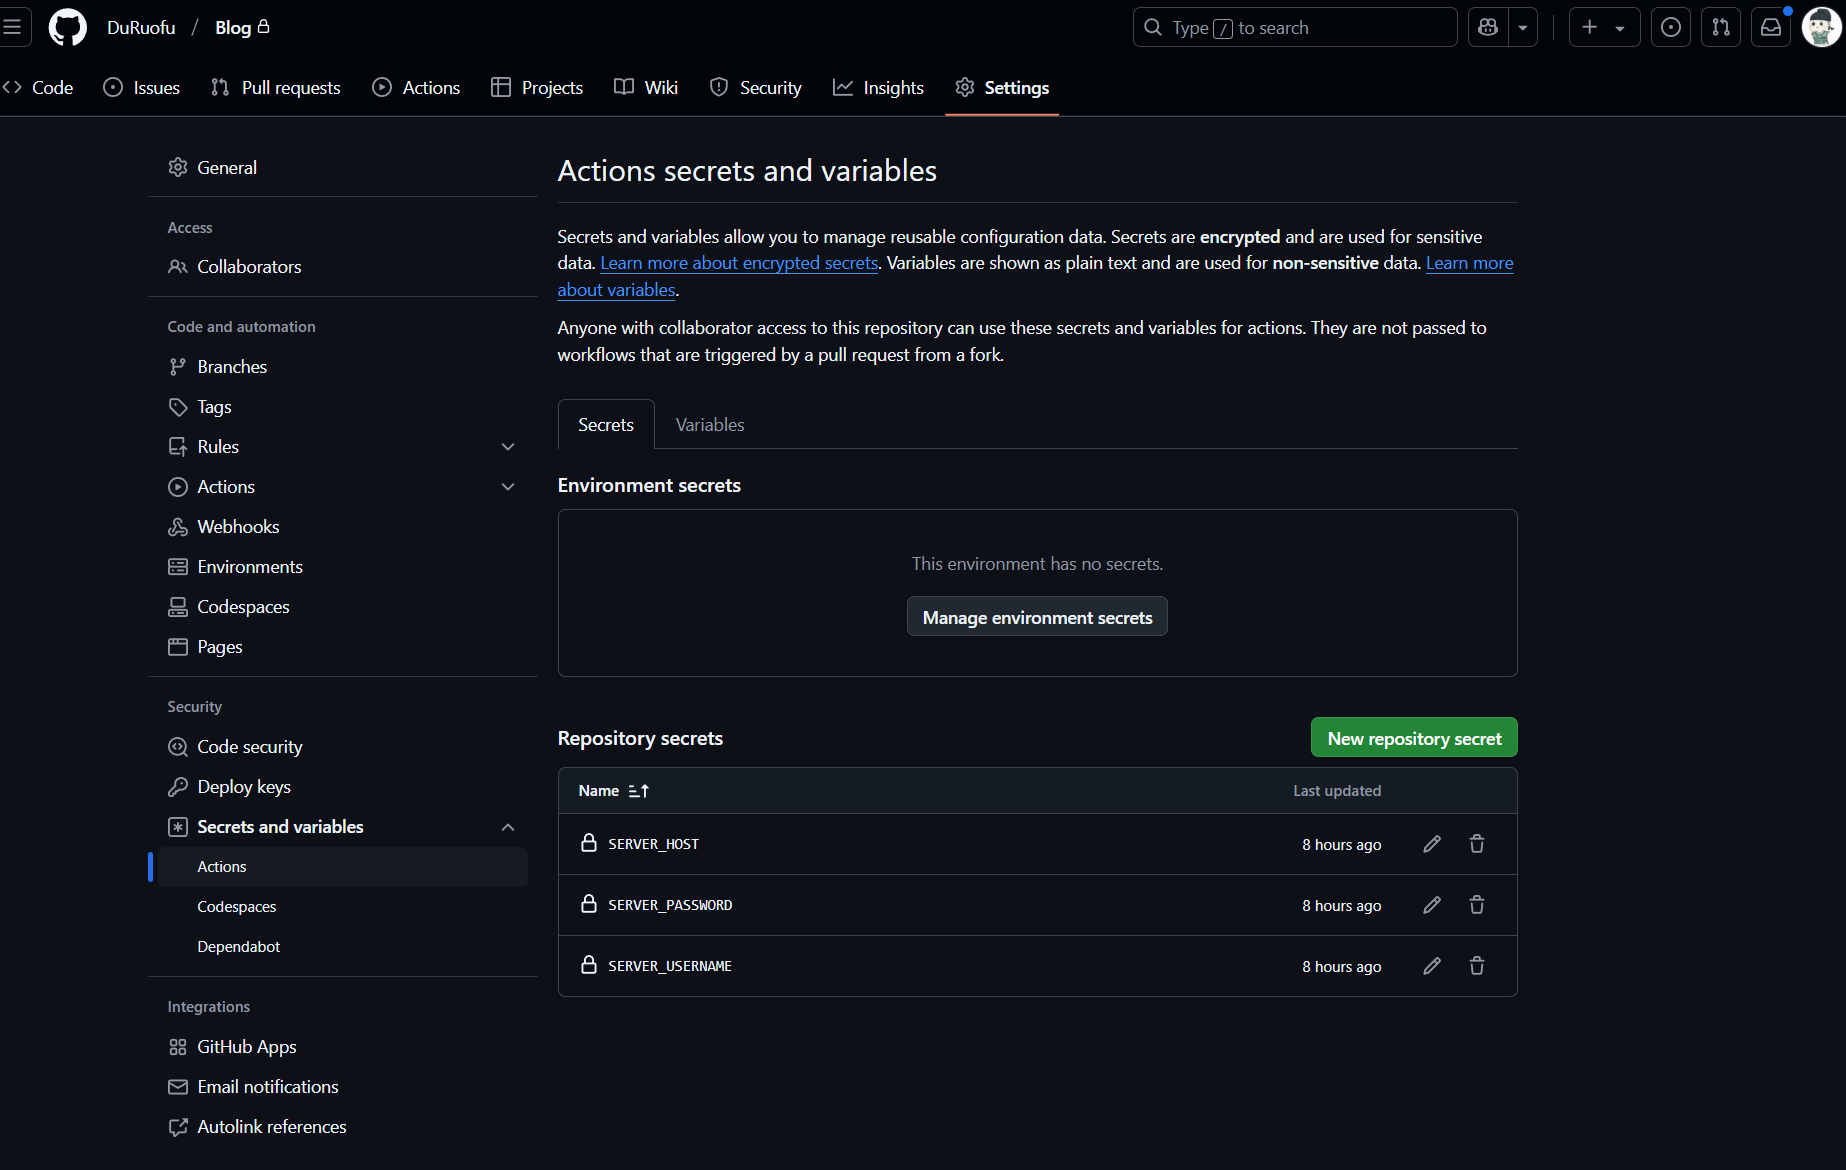
target: /root/data/docker_data/npm/data/Blog # 替换为您想要推送到的目标目录作用就是把编译产生的静态文件拷贝到远程服务器上,其中服务的IP,用户名等使用了Github的Repository secrets,在仓库设置的Actions secrets and variables中设置即可,如下图:
参考链接
- https://blog.csdn.net/qq_44734705/article/details/144314457
- https://huyipu.github.io/VitePress/快速上手/VitePress简介.html
- https://huyipu.github.io/
- https://lyxdream.github.io/note/vuePress-blog
- https://chodocs.cn/program/vitepress-plugin/#文档内图片放大镜-🔍-效果
- https://huyipu.github.io/VitePress/快速上手/VitePress实现自动侧边栏.html
- https://blog.csdn.net/weixin_46463785/article/details/128592061
- https://squid-xu.github.io/blog/vitepress/basics/No1.html
- https://github.com/squid-Xu/blog/tree/main/.vitepress/theme/components